Originally posted on Hektechnologies in 2018
I will be adding a video about this later, but for now, check out this video I found, which talks about everything you need to know to make and customize your Facebook group.
We see a bright future
Originally posted on Hektechnologies in 2018
I will be adding a video about this later, but for now, check out this video I found, which talks about everything you need to know to make and customize your Facebook group.
Originally Posted on Hektechnologies in 2018, I’ll be rewriting this in the near future
Building a website is easy when you know the right steps. I have a video I am making that shows you from start to finish.
If you want to get started before the video is done, I have a special offer I got from Bluehost! They are going to pay me a little and help support this blog when you use my link to sign up, and the best part is you will get a huge discount!
Check out the video below to get started with your Free WordPress website. Based on your feedback, I will add more information to this post and may produce another video to replace this one.
Thank you!
I originally posted this on Hektechnologies in 2020.
Ok, I know a little dramatic, but if you have been looking for a versatile WordPress theme that is both clean and powerful. Divi would be the right fit for that. If you want a WordPress theme to do split testing and other advanced things, look no further than Divi. If you want mobile responsiveness or want to take it further and have separate layouts for computers, tablets, and mobile again, Divi has your back.
The things that I mentioned are only the start of what Divi has to offer because you can get all of these features and, if you so choose, can continue using your current theme… (dun dun duuuun) Yeah, I know, right!
Before you think I am crazy, leave in disgust, saying, “what is this guy talking about?”
Let me start with the basics. If you are a web designer this will be gold for you.
If you read my review and like Divi, you can use my referral link, and I will make a little money for my effort; it will cost you nothing extra to do so and would be very appreciated by me.
Elegant Themes is the company behind Divi. In me, they have found a 100% convert. After working with and using their product for 5 years, everything I have seen is fantastic. They work hard to support issues.
They have not made any terrible negative changes to their overall offering and have worked to improve the product year-over-year. They constantly surprise me with newer and better features.
As a web development company owner, I spent upwards of $1,000 /yr on different themes and the required customizations of those themes. This also discounts the wasted time and effort in learning the ins and outs of a new theme, its development problems, etc.
Rather than subject you to a long story, I took what I originally wrote and made another blog post about it: Click Here To Check Out How Divi Saved My Marriage (JK, but I think I will write that post.)
You know the term work smarter, not harder. Well, this applies in spades here. When you spend money on most themes, you get the small set of designs they provide, and then you are limited to their choice of tools and procedures to edit that theme.
Outside of that, you are left hiring a developer or making code changes yourself. You get what you get and have to work within that frame. Not always bad, depending on your needs, but sometimes this can be a devastating problem for your profitability.
For some, this is more than ok and represents a healthy challenge in creativity, but it was always a sore point for me. I feel like you need to be able to make changes quickly and then own those changes.
With WordPress, everything is GPL, and you DO own those changes; however, Divi takes it a step further and provides an abstraction layer between the technology and the design that leads to something elegant (no pun intended).
Divi theme was originally the only way to use the Divi builder plugin. My first run-in with a builder plugin was WP-Bakery’s Visual Builder (I think they changed that name). It was cool you could make edits and pretty much see them live.
Then you could manipulate a page to your heart’s content and a level of perfection typically reserved for coders by adjusting sliding size bars or typing in parents etc. Some people have recently been excited about beaver builder; I mention this one because it reminds me so much of what Visual Builder used to be or what it wanted to be.
But Divi… Divi takes things to the next level. The smoothness of operation, the powerfulness of option, and ease for a non-developer are all things that set it far apart in my mind. And for the developer types, you have an API!
https://www.elegantthemes.com/documentation/developers/
I won’t get into details about the API and its uses in this review post, but it is awesome! I have made some very cool automation and have been working on a deployment app that might never get finished, but I have learned a lot in the process that will be useful later.
I have a few things on the back burner related to A/B testing. But yeah, for you marketing nuts out there that want to test every aspect of a page, from the color to the button shape. You can do that easily.
Back to the discussion. Besides making my websites look better, have a quicker turnaround, and sell easier, Divi was just fun. You get that immediate feedback even when you can do it right on the post or page in the visual editor.
(Video on how to write a blog post using Divi visual builder) <— I have to remake this video, but I promise to update this soon.
The other big thing I love is that clients can edit things easily. It used to be so complicated to explain to clients how they could log in to WordPress, find the post or page they want to edit, and do it from the backend.
It seemed easy to me, but no matter how often I showed people, I always got the same questions. The fantastic thing is when I started using Divi, these questions stopped.
My YouTube used to have many more videos about editing Posts and Pages on WordPress; many are unlisted videos made for specific clients. However, I can point people to 1 video with Divi and know they will “get it” every time.
For me, this means websites can be a more passive form of income. Now we can charge a yearly maintenance fee and sell blocks of support hours or make other similar offers. Before Divi, I spent 2-10 hrs a week or month per client updating and changing things because they couldn’t figure it out.
It pays; however, it is not what I want to spend my time doing.
The secret message I am telling you right now is that complete beginners who are NOT “web people” can easily use Divi. After logging in, they land on the page they want to edit, hit “edit with the visual builder,” and start making changes!
If you’re a beginner, here are some of the problems you will avoid
To give you some insight here, I have web clients that are in their 80s and find Divi easy to use. The general concept being if someone can operate Outlook or Thunderbird to make an email look pretty, then they can use Divi to make their website look like they want or say what they need it to say.
I’m going to make another version of this review. I’m also going to review the other products you get included in your Elegant themes account, including Extra theme, Bloom (email signups), and Monarch social media integration.
If you found my review helpful and decide to purchase Divi, you can use my link, and I will get credit for your purchase. It will not cost you any extra, and it helps me out a ton! Click Here To Buy Divi
These warnings are part of the same “breakage.” Basically, you need to update or remove Revoslider as it is far enough out of date to cause PHP errors. If you previously purchased Revoslider, then updates are free.
However, if you need support because your issues are worse than an update, you can get support by purchasing the support plan here on Envato’s Code Canyon: https://1.envato.market/LPxAnY
There is not much more to cover on this one. You either need to update or get a support license. Leave a comment 🙂
Original Error:
Warning continue targeting switch is equivalent to break did you mean to use continue 2 /wp-content/plugins/revslider session_start(): cannot start session when headers already sent in /wp-content/themes/yourtheme
If you have been struggling to find a way to work with notes in a team setting, we have worked out a free method using Obsidian and pCloud. Obsidian is suitable for use even on an individual level, and following this method, you could potentially share access to a work email or sync your notes between computers. Read along as I guide you through the process of setting things up. Leave a comment if you want more articles about Obsidian.md.
The first software we will be using here is Obsidian which you can download here.
Install the software as soon as the download is finished, and from there, you can create a new vault and start making notes, make sure to name your vault and pick a place to put your vault to keep things organized.
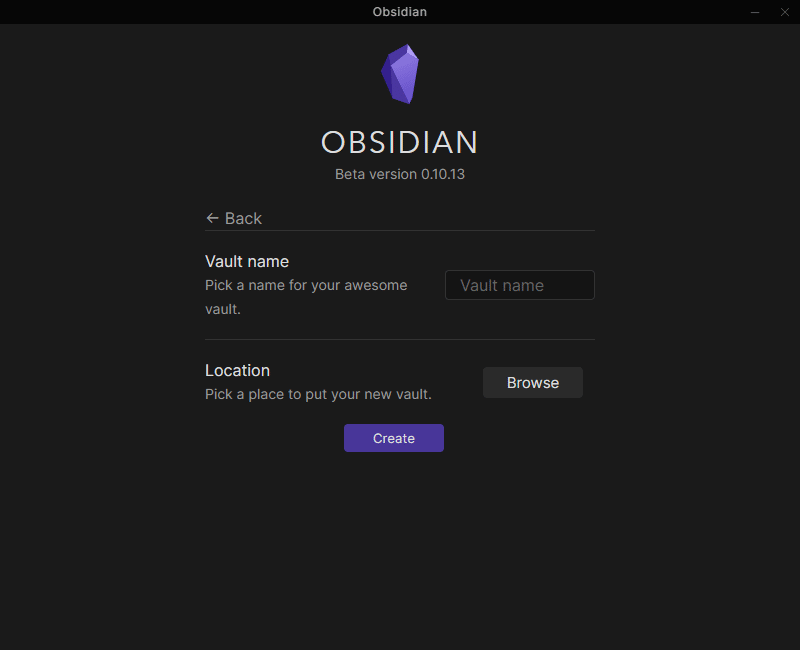
There is an option to place your vault by clicking the “Browse” button next to “Location.” We can use cloud storage, pCloud, to give people access to the same vault anywhere. Keep reading to find out how to do this.
Once Obsidian is done, we can leave it, for now, to set up some things that we need to use Obsidian efficiently. One of the good ways to use obsidian notes is to have cloud storage available to everyone, so the notes would be accessible by the group or specific individuals you need to access.
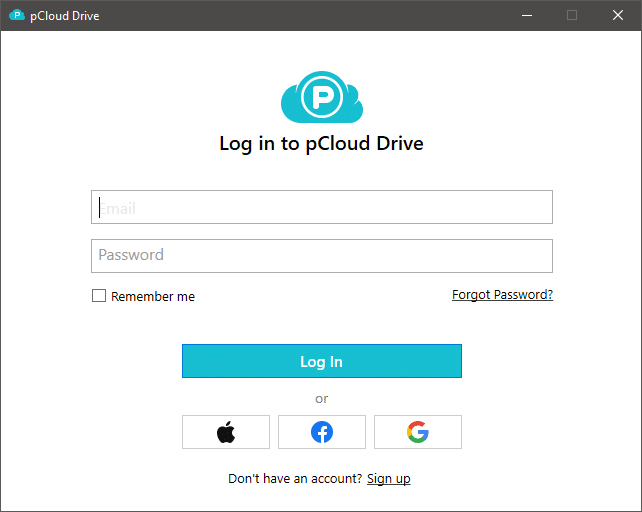
For this documentation, pCloud will be the software used for cloud storage. pCloud can be downloaded here. After downloading the installer, proceed to install the software and launch it after installing. At this point, proceed to login into your pCloud account (you can create one if you don’t have an account yet).
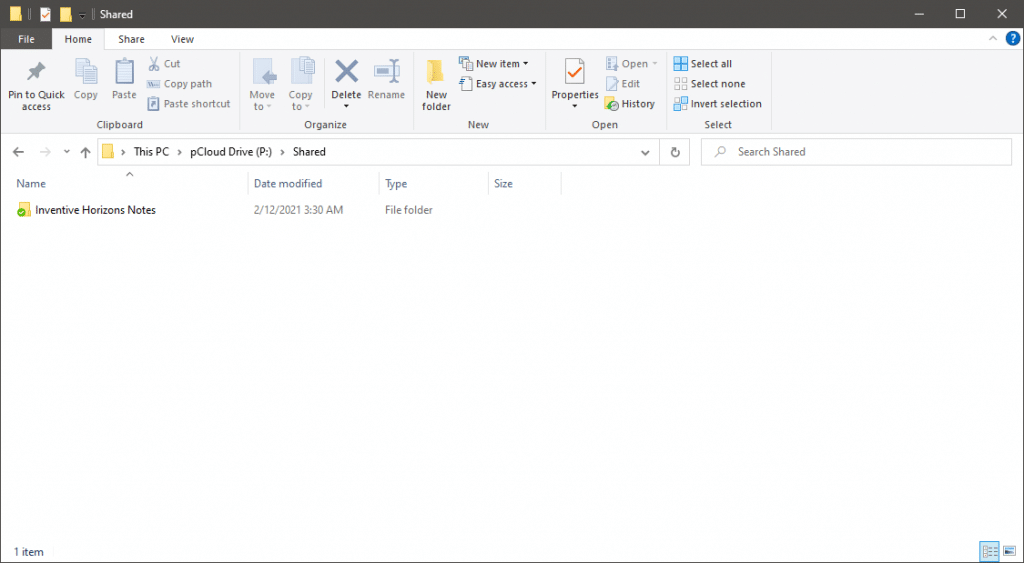
Once having a pCloud account, you will have cloud storage that will serve as a medium to place our obsidian notes to share with others. After installing pCloud and setting up an account, there should be a new drive that would be available on your computer’s files, typically named “pCloud Drive (P:)
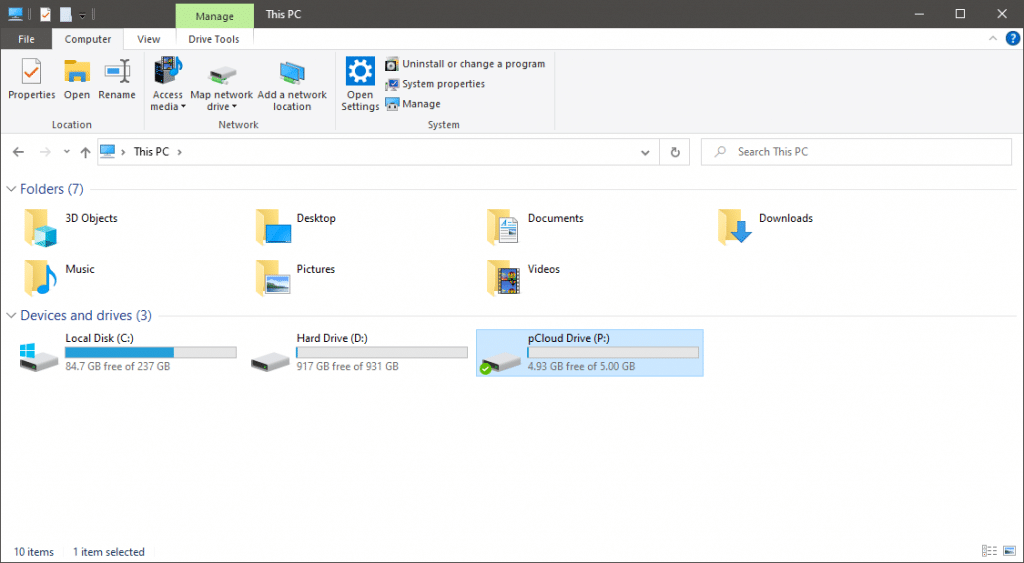
From there, you would have your cloud storage. pCloud has features that allow you to share the folder with your friends, request files, etc., which would be great for collaborations.
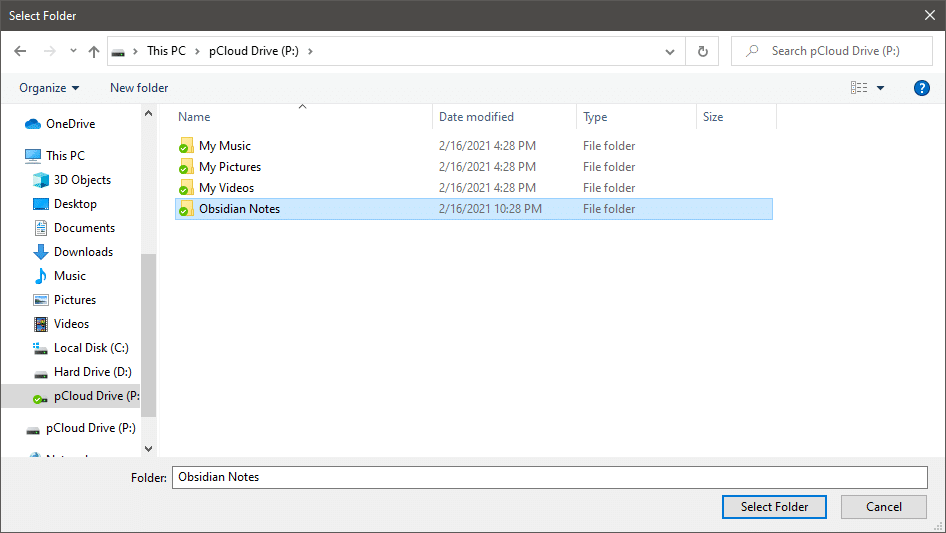
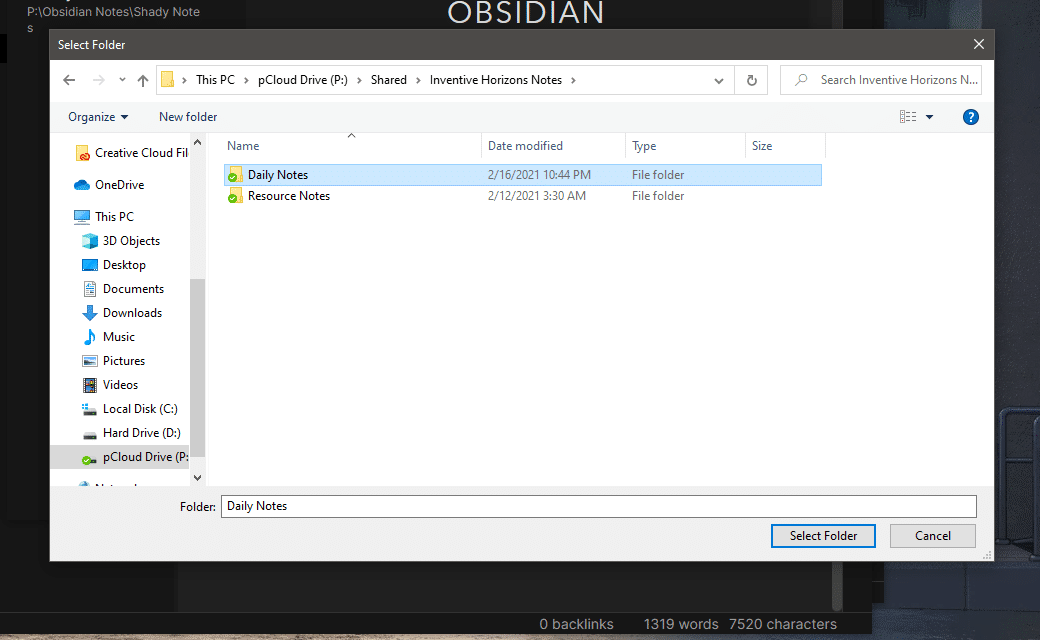
Having the cloud storage prepared before, I will discuss how to share your Obsidian notes for collaboration with others in this section. Starting from the Obsidian Notes, create a new vault, name it on your preference, and then place the vault inside the cloud drive as its location.
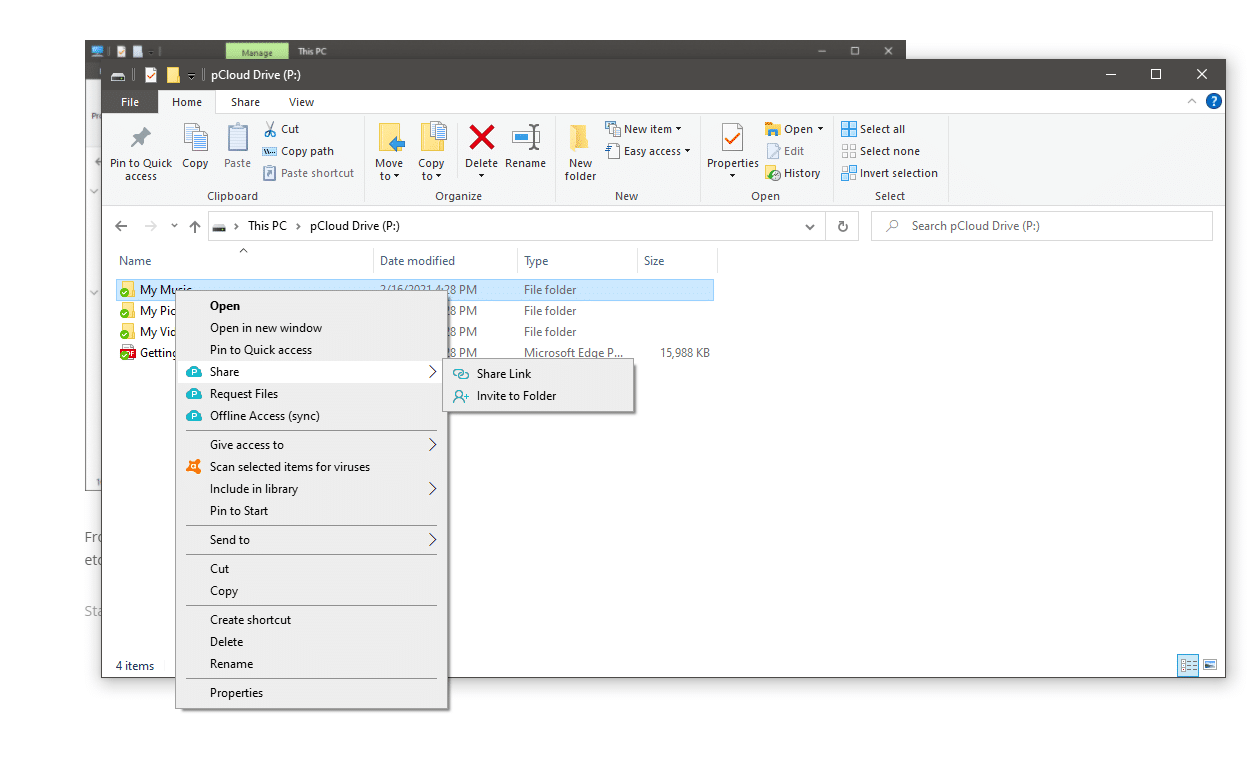
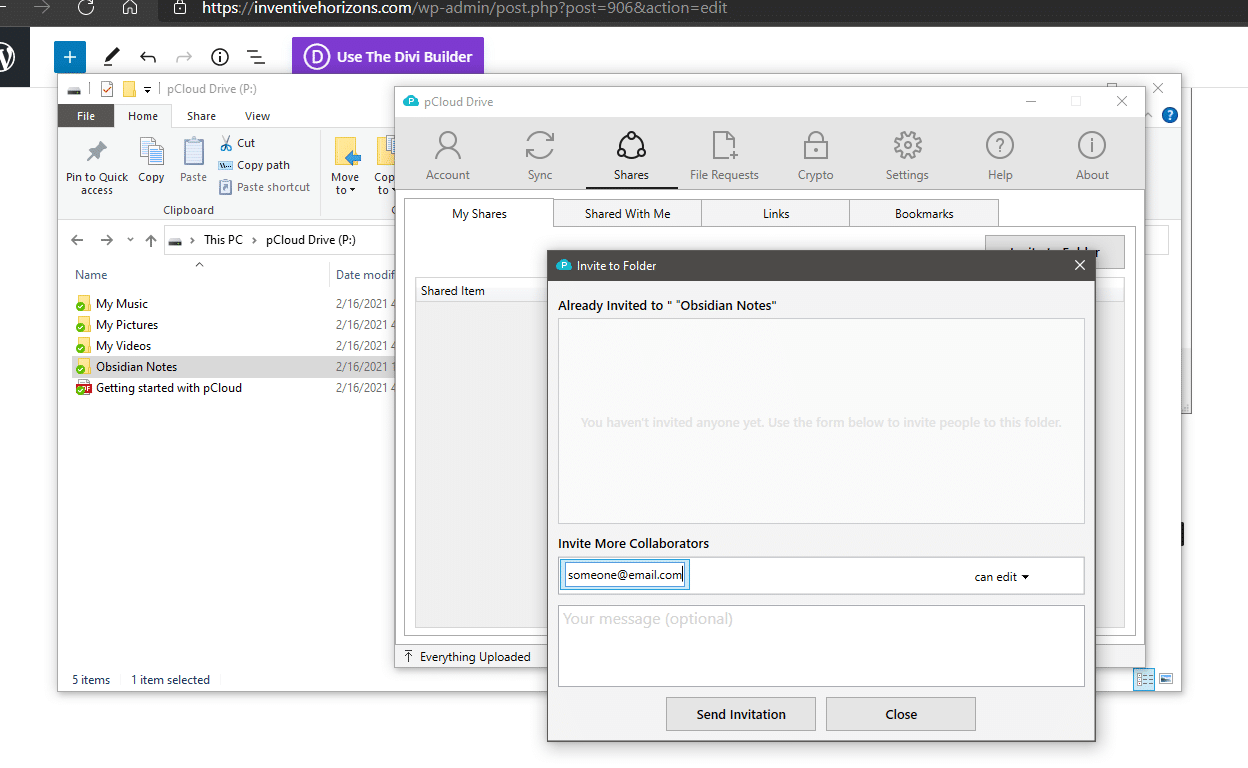
Now you have your vault set inside the cloud drive. To share your vault with others, share your cloud storage from your file explorer. Right-click on the folder that you want to share, hover to the share, click on Invite people, enter the person’s email address that you want to invite, and send the invitation.
To accept an invitation from pCloud, open the pCloud software, and hover over the shares; from there, you can view all the invitations people sent you.
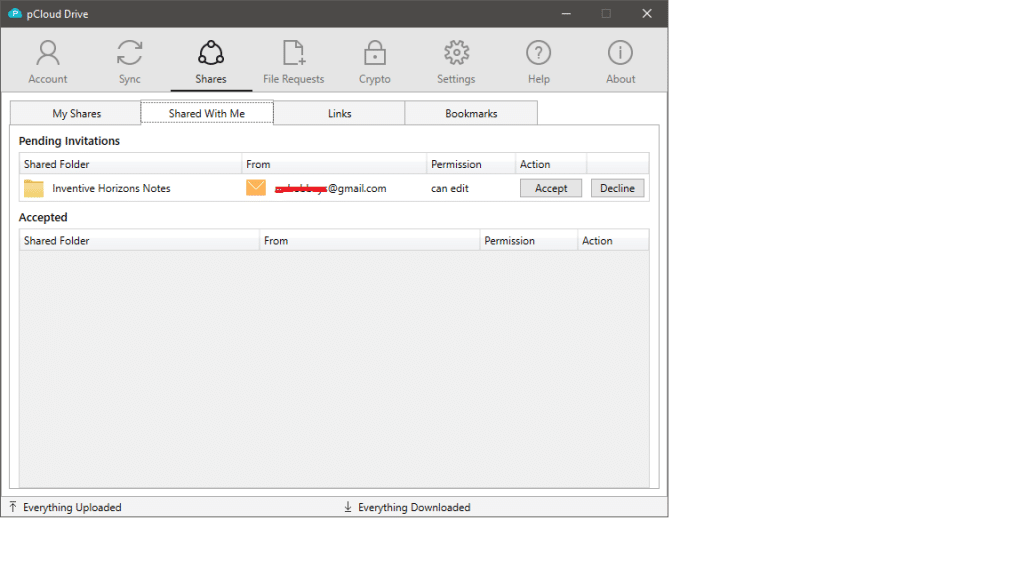
As Default, it would show named as “Shared” from the cloud drive. You can find shared folders but are not required to use this folder exclusively.
And to access their notes from the Obsidian software, you have to open the vault at the location where they have it. In this case, we set up our notes inside the directory Inventive Horizons Notes>Daily Notes
There you have it; you can collaborate notes as long as everyone saves them in the same folder on the cloud storage.
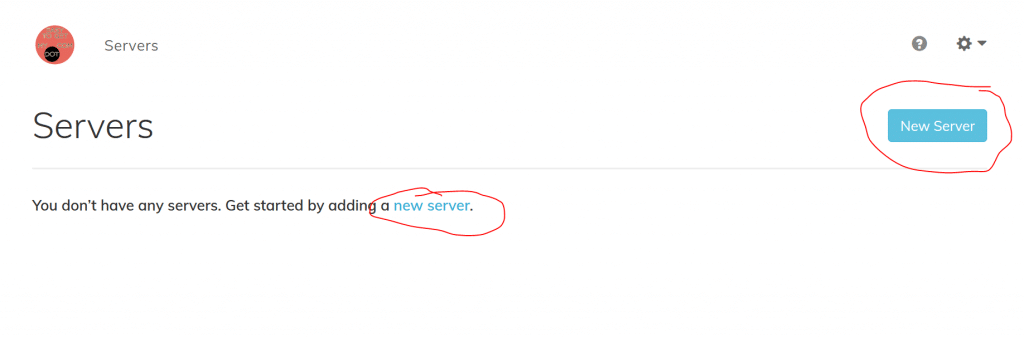
This is how to create a site for a customer using our Hostlaunch setup. This gives a DigitalOcean Server and Serverpilot control Panel clone. I’m working on improving this, however this is a very good option when someone needs their own server for security purposes, SEO, or performance. This also gives more options, but that is outside of the scope of this document.
First before we can start we need the customers email and/or domain name to get started. If they do not have email yet because we will setup an email server there would be some additional steps that I do not want to “publish” at this time. For this case just let me know directly. For this example I am going to get a domain for the customer so we will head over to our domain reseller https://www.easytogetmy.com/ there are 2 versions to this site the www version is our GoDaddy reseller and the none www version is our private managed hosting. I will get into details of each in other documentation as we are going to look at our HostLaunch hosting located at: https://etgm.hostlaunchcdn.com/signup
At this point our managed hosting is via invite only https://easytogetmy.com and more guides and information will be added to this site for people that want to have blogs or other static pages.
To break down the requirements again you need:
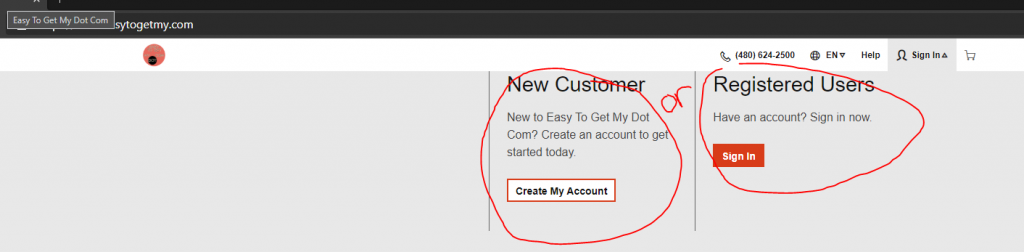
Once the customer has gone to Easy To Get My Dot Com they will need to either sign into their account or create an account:
Once logged in there is an easy to use search bar for finding a domain:

Searching can be done using the name of the customers company or something similar to what they are offering. In this case I search for “my new company”, notice I don’t worry about spaces, and the system automatically determines the domain I was looking for was the combination of all my words and shows it was taken. However, it offers several suggestions of things that are similar but available for purchase. If you are getting something it is wise to ensure you are not infringing on any trademarks or copyrights:
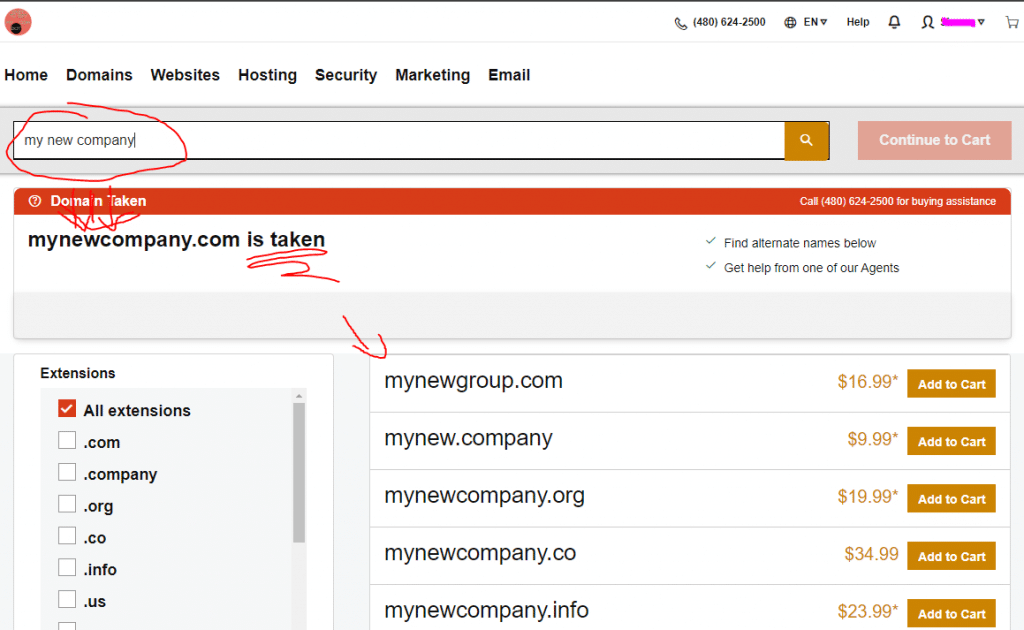
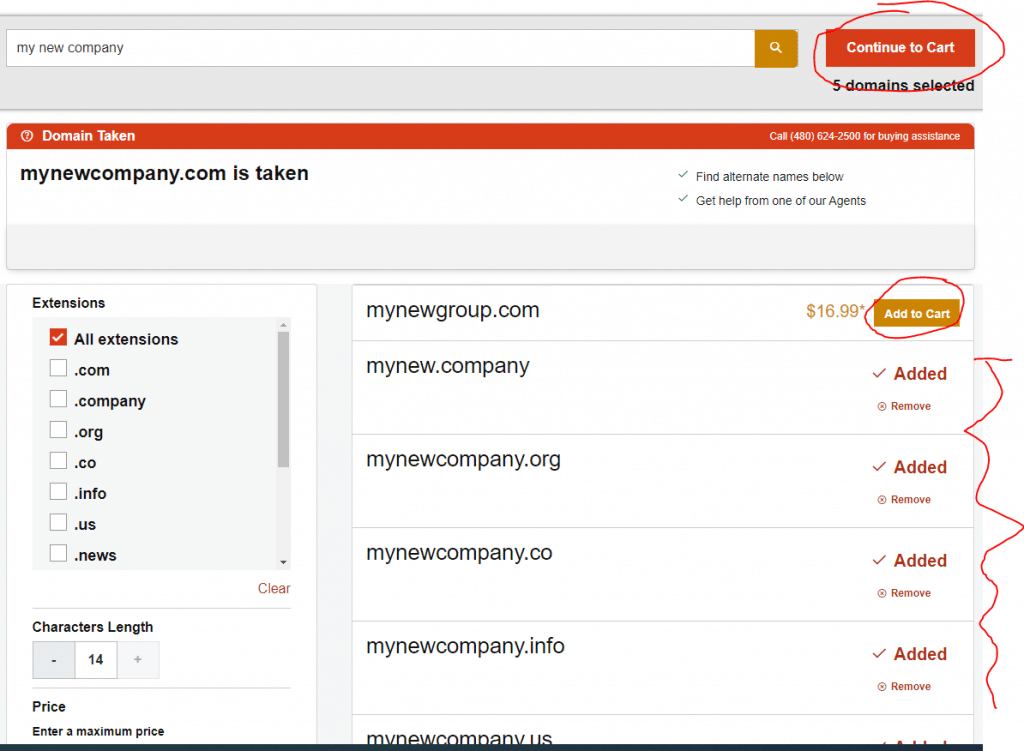
Once you have selected a new domain click the “Add to Cart” button next to the domain. It will leave you on this page so you can keep selecting domains you like, or even search for more domains. When you are done click the “Continue to Cart” button:
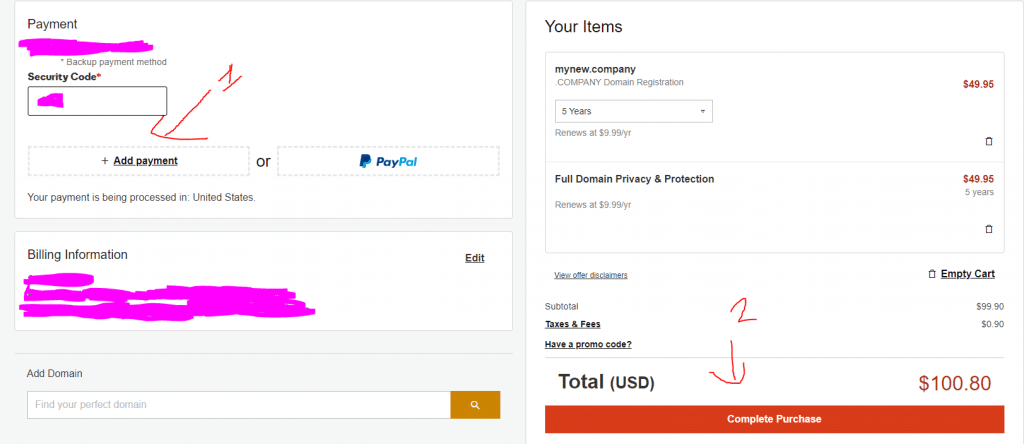
On the next page you are going to be asked about “Privacy & Protection” settings for your domain. I personally do this for about 80% of my domains, and I own hundreds of domains. The reason for doing this is simple. It will help cut down the spam and junk you will get in the mail, email, and even calls. People will send you all kinds of junk about how your domain is illegal or you about to loose it etc. If you are good about ignoring these things and don’t mind the constant annoyance then don’t get the protection. However, if you are like me and busy and tired of all the junk the $9.99 or $29.99 for Ulitmate are well worth the price. Especially since it is only a yearly fee.
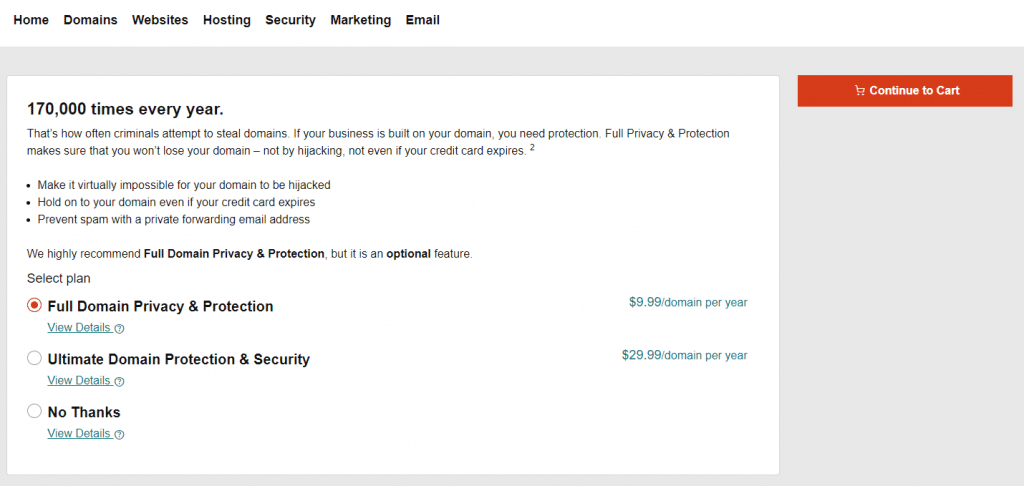
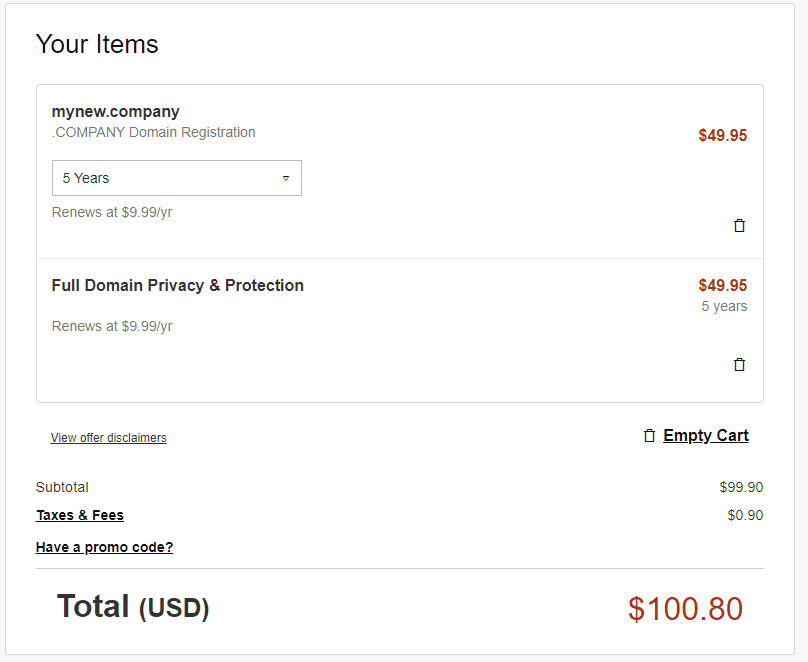
If you select a restricted domain you might need to answer some additional questions. Just answer them honestly and you will move to the next step which will let you check your finial cart and select your term of ownership. If you are satisfied you can add your payment info on the left and complete the purchase:
Now that we have the domain we are able to start the next part of setting up hosting!
Getting started with our Hostlaunch Private Server Hosting is very simple. We may change the name of this in the near future, but regardless this will help you get started. First on the signup page you will only need an email and password:
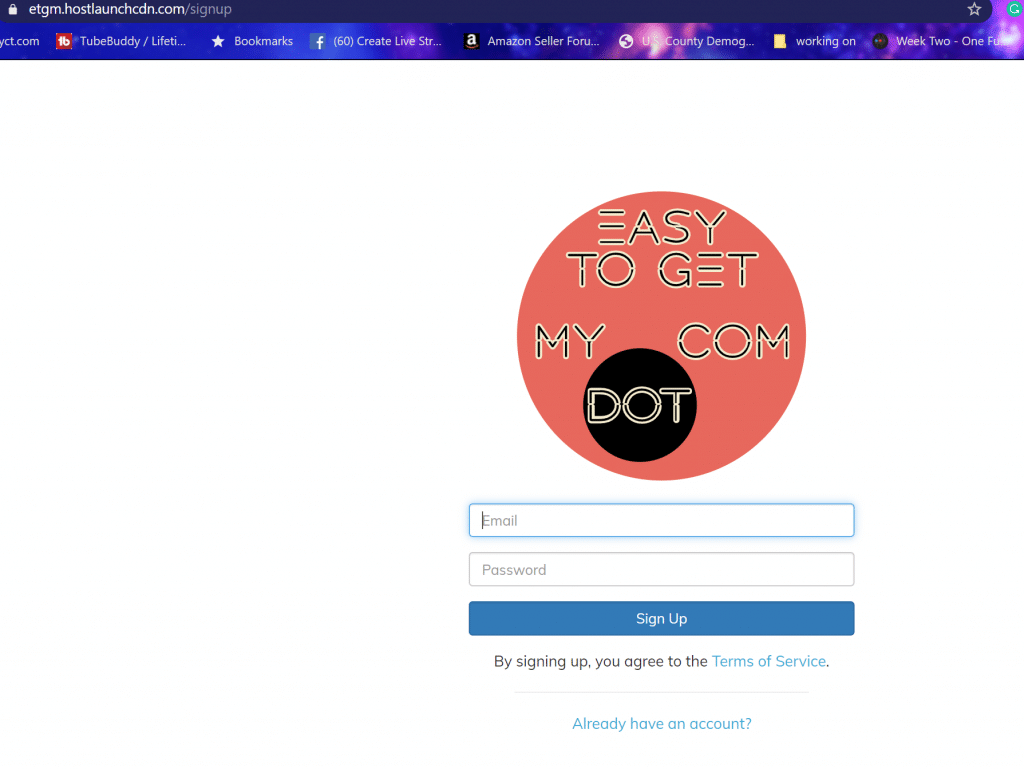
I recommend saving your password if your browser allows you to do so. The first thing you will be required to do is enter your billing info so that you can get started using the service.
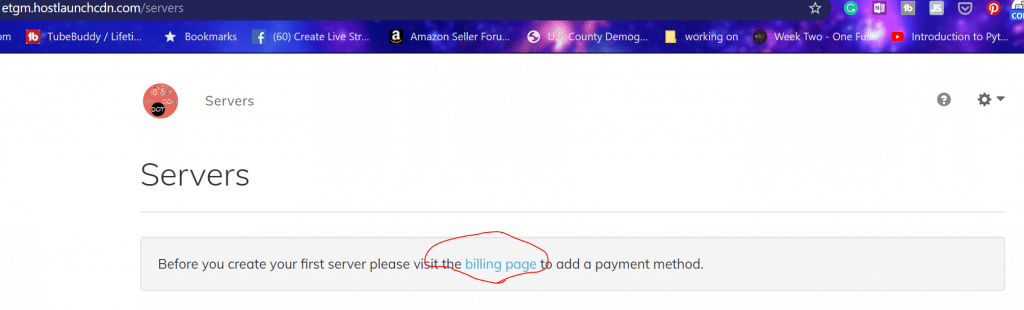
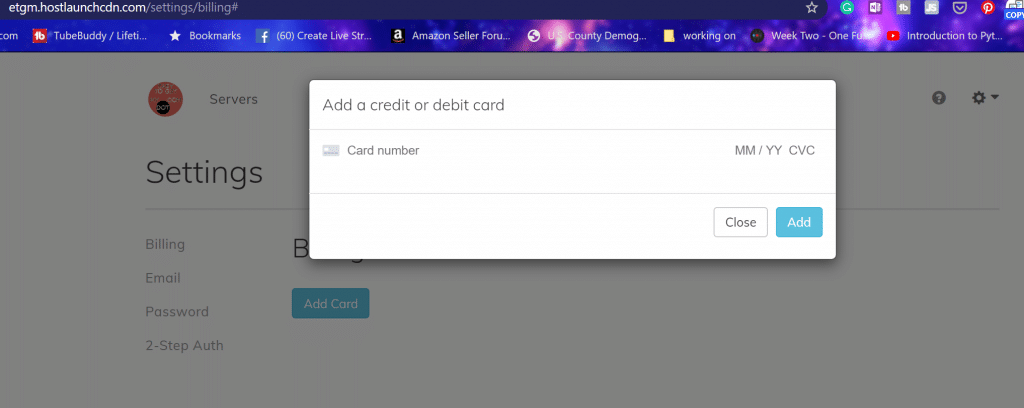
Once you enter the billing information you will see you can manage the other parts of the account in this same area. Now you will have a new option to add a server:
Clicking this will allow you to select from the options and pick based on your actual needs. The full list is very much overkill for the typical site and you will typically only need one of the top 4 options:
| Memory | vCPUS | Storage | B-Width | Sites | Price | Purpose |
| 1 GB | 1 | 25 GB | 1 TB | 1 | $30 | Blog or “I’m here” |
| 2 GB | 1 | 50 GB | 2 TB | 2 | $40 | Blog or “I’m here” |
| 3 GB | 1 | 60 GB | 3 TB | 10 | $75 | Ecomm or Big Blog |
| 4 GB | 2 | 80 GB | 4 TB | 20 | $92.73 | Ecomm or Custom |
Blog sites and “I’m here” sites are general purpose. with 1TB of bandwidth you would need tons of traffic to get above that. I have turned these values up the best I could so that you would have a site that should work with hundreds of thousands of monthly visitors. I also didn’t go for the typical .99 pricing and just left things even numbered except where I could find a little place to offer additional value or discount such as seen with the 4 GB 2 CPU option.
The reason why things are structured and priced the way they are this hosting is not going to just hang out and hope for you to keep the server up-to-date and secured. Instead we have set things up so that 99% of that is taken care of for you.
This means we have optimized the server with caching, secured it with the best practices, and set it to auto update. You will also get SSL for free, but need to email support to activate this feature until a future update.
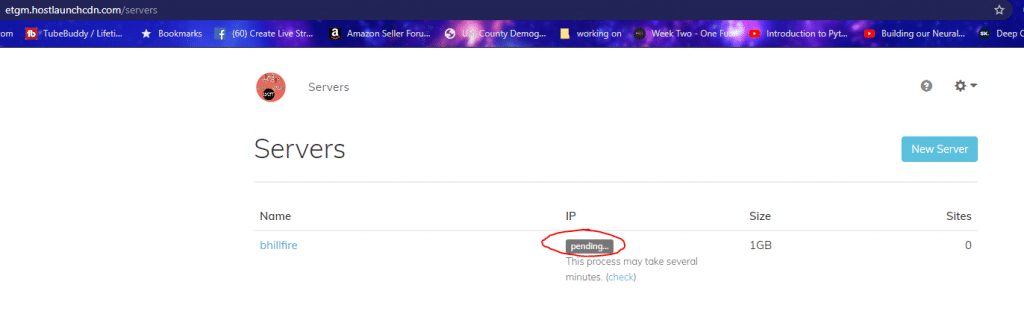
Once you select your option and click next you will need to wait several minutes. If your server is not created within about 10 minutes there may be an issue and you should check out our support site. You can click the “check” link as many times as you would like to refresh the status and see if your server is ready to use.
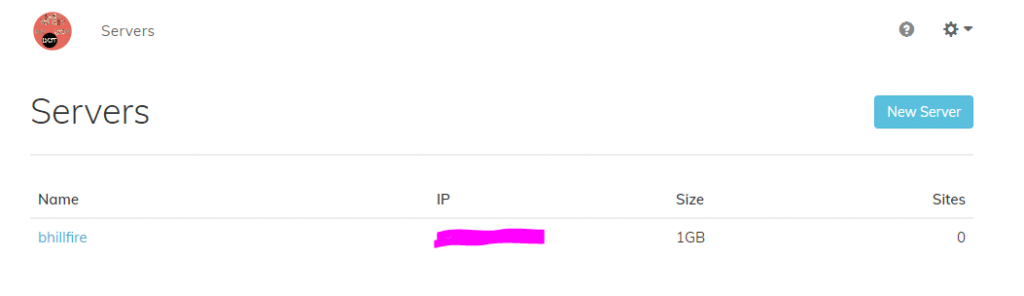
Once the server setup is completed you will be greeted with an IP address and several options when you click on the server name.
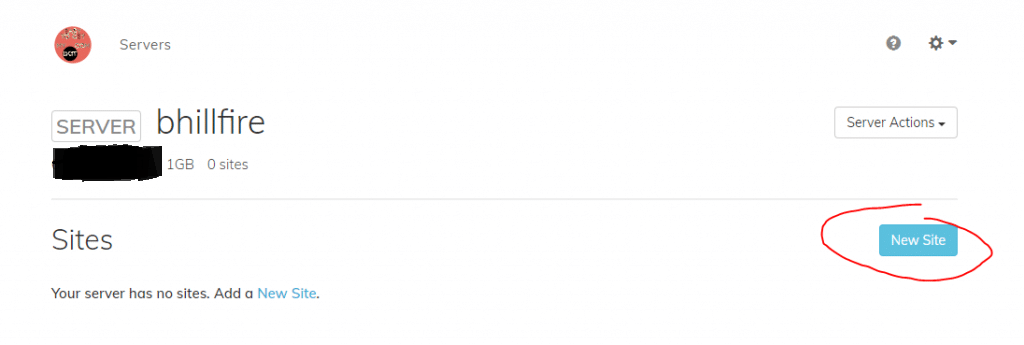
We will use this section to make our new site:
Start by entering a site name and the domain you have previously purchased. If you need a domain please visit our reseller site: Easy To Get My DOT Com
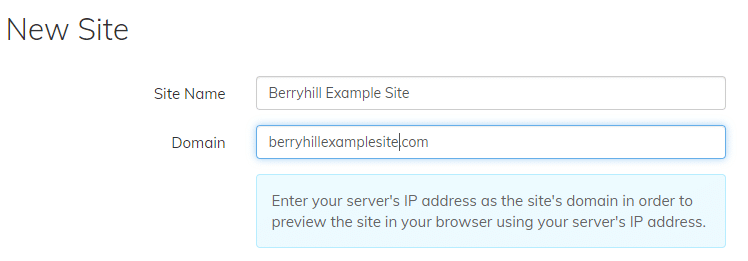
If you see my example above you will see I use capital letters and spaces. This is NOT ALLOWED.
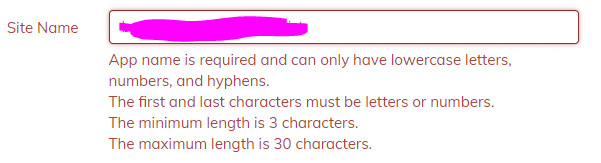
Site Name here is the way the system keeps track of your server, and to work properly it must be all lowercase, numbers, and single hyphens only. You must also have between 3 and 30 characters and not start or end with a hyphen.
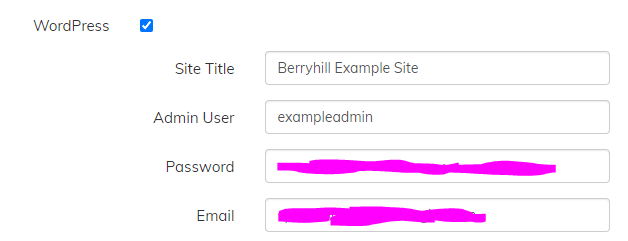
Next you are going to set your WordPress options. Pick a site title that fits your brand or purpose. Name an admin user. It is smart to make an admin user one that you will not use to make posts or pages, but this is not as important as it used to be. Pick a strong password, and add your email. This email will give full access and control over your site so you want to make sure it is one you know how to access.
The next part you are picking the server options including PHP version which should always be the newest available version that is not a BETA. You will also setup an FTP user either using an existing user if you have already made a server before and are using these docs as reference, or if this is your first go around you can make your FTP username and password here. DO NOT MAKE THEM THE SAME AS YOUR WORDPRESS OR HOSTING ACCOUNT!!!

Once you click create your site will be made in a matter of moments. You will be able to visit your domain and login using the credentials you setup earlier. Then you can start doing all the wonderful WordPress things you have been looking forward to 🙂
Back inside your www.easytogetmy.com domain manager you want to start by clicking on the domain you intend to use:
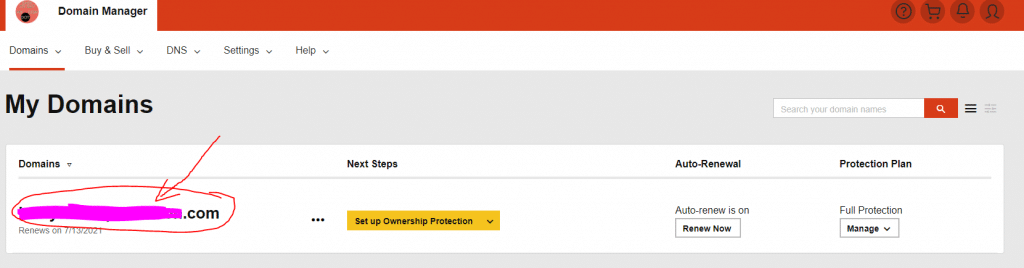
Once you are inside of the domain control area scroll down until you see “Additional Settings” and “Manage DNS” click on Manage DNS:
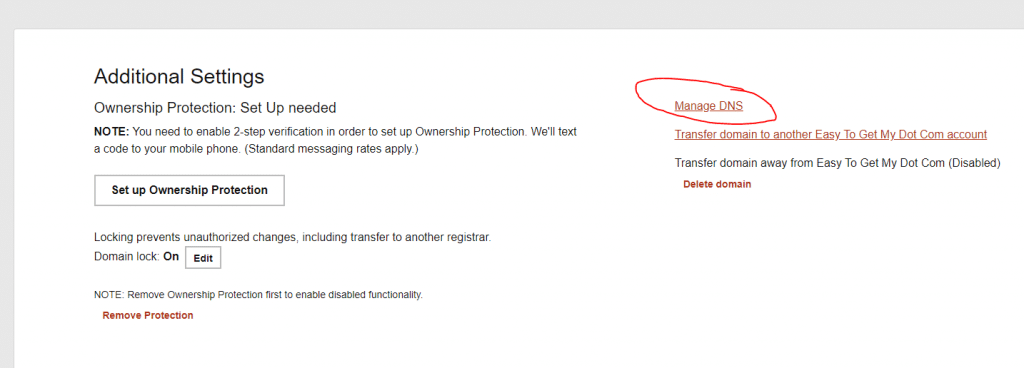
Inside this area you are going to put your IP address from your server for the A-Type Record value replacing what is typically “Parked” this will be all you need to do at this time except for wait up to 48 hrs.
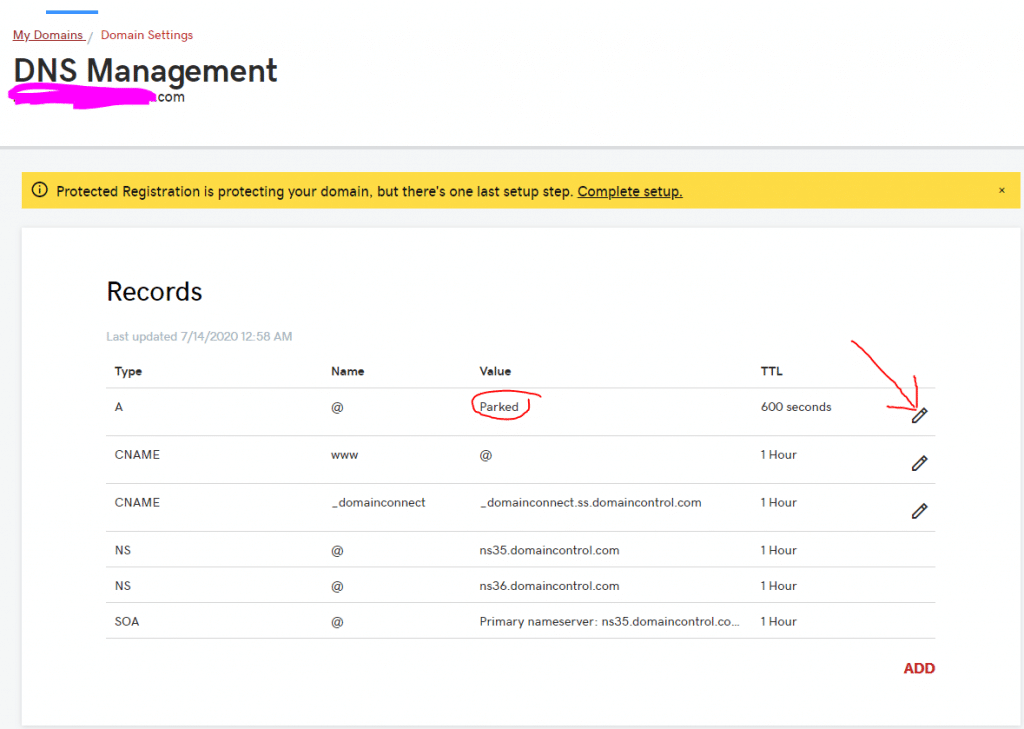

Once DNS has had time to settle you will be able to visit the domain name you setup and see your new site. To login you need to add to the end of the domain /wp-admin/ and use the username and password you setup in the previous steps. I will have more tutorials coming in the near future on what you can do next from here.
Remember this is your own full private server where you can experiment or build your business etc. Actions you take on this server will only effect your site/server. You will have full access to the backend using SSH and full access to the files using SFTP.
Each new WordPress install will come with some sample content even when the site is imported from an existing WordPress or other supported platform. This describes the way to check for and remove the “sample content”.
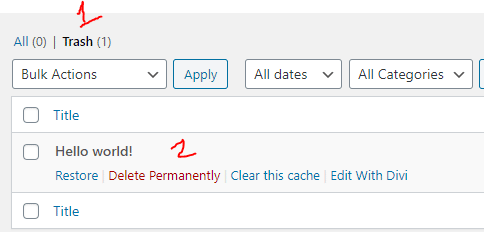
First start by looking in the Posts section of your menu:

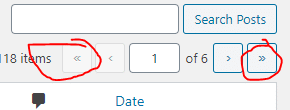
The easiest way to look for the sample content is to search for the word “Hello” as the Posts section sample content is “Hello World”:

If nothing is found you can look on the first and last page by using the double arrows “>>” or “<<“:
When you find sample content you can simply move it to the trash:
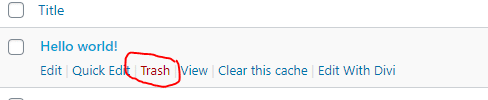
Once you have moved it to the trash you can delete it permanently by clicking on the trash link then clicking “Delete Permanently”:
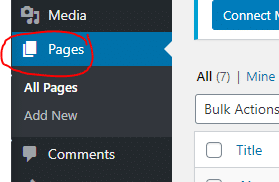
Pages like posts have some sample content and the process is much the same with only the name changing. This time around we are going to be getting rid of “Sample Page” get started by clicking on Pages on your menu:
Most sites are going to have a small enough number of pages that you could see directly if the Sample Page exists:
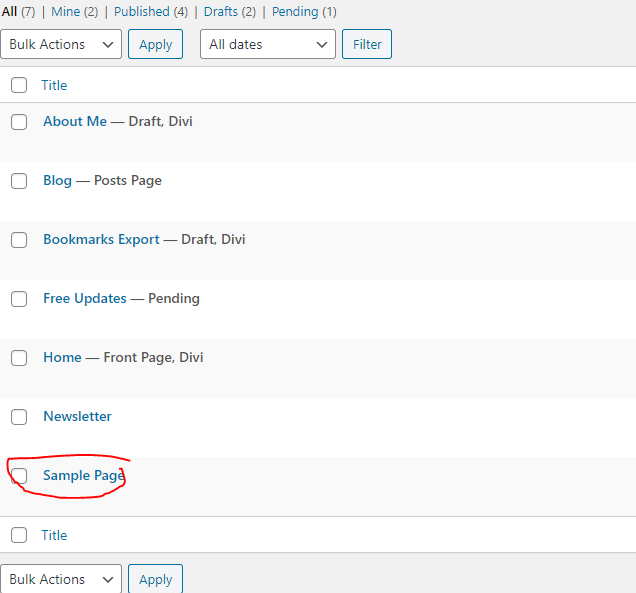
Just as before click the Trash option that appears when you hover over the page:

Just as before a “Trash” option will appear at the top of the Page list and you can click on it to find the Delete Permanently option:
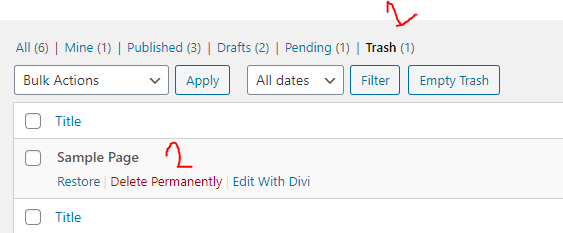
With that done all sample content should be removed!
This is the link to ClickFunnels:
Please use that link when you create the account as that is part of our compensation via affiliate revenue and will allow us to directly support your account.
There are two options for the account you only need the smaller one to start with. This is not just a website builder it is an all-in-one marketing and sales platform. I can explain anything you need no request.
The other thing to keep in mind this is called Lead Funnels, but it is the same thing, you just get some free templates by using this link.

Originally posted on Hektechnologies in 2018
You can easily sell this system to businesses and entrepreneurs with minimal effort! Today you are in luck because I am going to help make you an affiliate of Click Funnels!!! Click here to or keep reading to learn more.
Many of the things you will see to work at home or start your own business are hard. They require money to get started or some other commitment that is hard to meet, such as purchasing a lot of products. ClickFunnels is not like that!
Every business owner these days knows they need a website, and ClickFunnels is like a website, only about 100x better.
I tell people it is like Web 3.0, and they can get started while things are still new and there is much money to make. The nice thing is this is an additive business. That means when people purchase a ClickFunnels account, they make money and keep it running for a long time. You make money month after month because they don’t quit! So if you want to s click the link!
NO!!!
You can start today just by getting an affiliate account through me! Exclusively by using my link, you will get , and you will get a jump start on getting new signups and making money right away!
I have much more to say about this, but I have to go for now. If you still want more information, sign up for our email list, where I will send you helpful info that will get you started!